Google
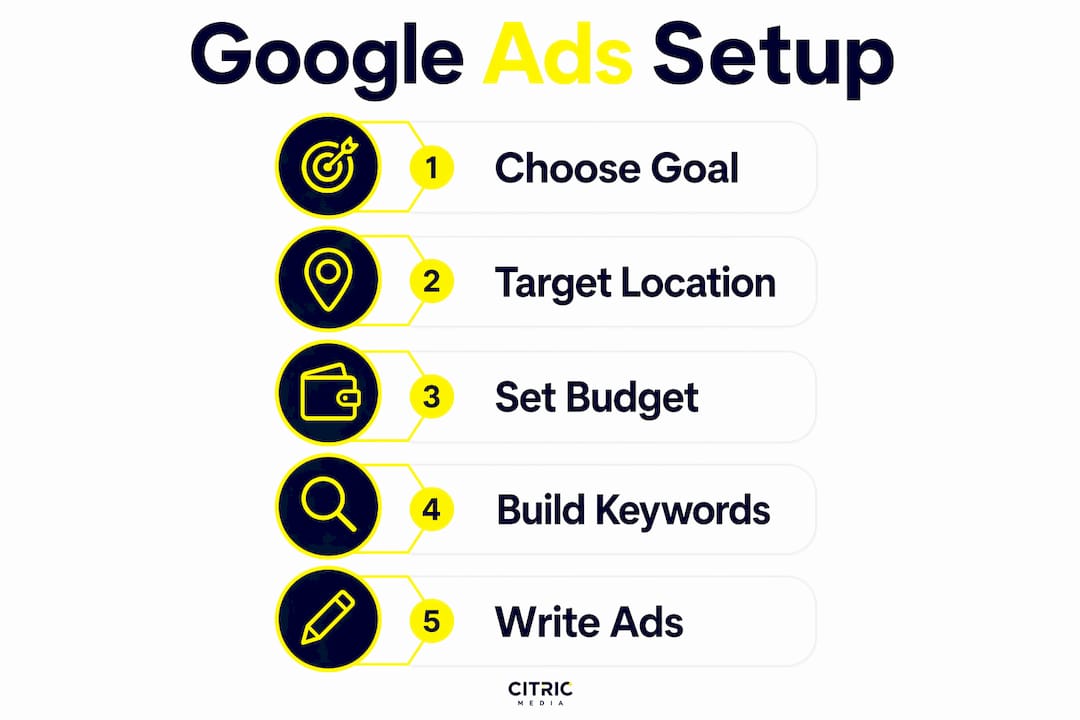
Google Ads setup is the process of creating, configuring, and launching a targeted paid search campaign on Google’s advertising platform to generate measurable leads and sales. A proper step by step Google Ads setup requires Expert Mode, conversion tracking, and precise targeting from day one. Skip any of those three and you are paying for data you cannot use. This guide walks UK business owners and marketing managers through every stage, from account creation to campaign launch, using the configuration standards that professional PPC managers follow in 2026.
What do you need before setting up Google Ads?
The right preparation prevents the most common beginner mistakes. Before you touch ads.google.com, gather the following:
- A Google account dedicated to your business (not a personal Gmail)
- A live website with a working contact form and a separate thank-you page
- Google Analytics 4 installed and verified on your site
- Google Tag Manager set up and the container published
- A clear monthly budget in mind, even if modest
- A shortlist of 10–20 keywords relevant to your service or product
The thank-you page deserves special attention. Most beginners skip it and use a pop-up confirmation instead. Pop-ups undermine tracking because conversion tags cannot fire reliably without a unique URL to trigger them. A dedicated page at something like /thank-you fixes this immediately.
Smart Mode vs Expert Mode
| Feature | Smart Mode | Expert Mode |
|---|---|---|
| Bidding control | Fully automated | Manual and automated options |
| Keyword targeting | Broad, Google-managed | Phrase, exact, and broad match |
| Location precision | Limited | Full postcode and radius control |
| Negative keywords | Not available | Available from campaign creation |
| Recommended for | Never | Always |
Smart Mode removes the controls you need most. Expert Mode is the only configuration worth using for any serious campaign.
How to create your Google Ads account and switch to Expert Mode
Account creation takes roughly 30 minutes when you follow the steps in order. That time investment pays back quickly once your campaign is live and tracking correctly.
- Go to ads.google.com and click “Start now.”
- Sign in with your business Google account.
- When Google asks for your main advertising goal, scroll to the bottom and click “Switch to Expert Mode.” Do not proceed through the default Smart Mode flow.
- On the next screen, click “Create an account without a campaign” to avoid being pushed into a guided setup that limits your options.
- Set your billing country to United Kingdom, your time zone to (GMT+00:00) London, and your currency to British Pounds (GBP).
- Complete billing details and confirm your account.
Pro Tip: Set your time zone correctly at this stage. Google does not allow you to change it after account creation, and a mismatched time zone corrupts your scheduling and reporting data permanently.
Once inside the account, you will see the full campaign dashboard. This is Expert Mode. Every setting described in the rest of this guide lives here.

How to build your first Search campaign for lead generation
Search campaigns target people actively searching for what you sell. That intent makes Search the right starting point for small business Google Ads setup focused on leads and sales.
Step 1: Choose your campaign goal and type
- Click “New campaign” in the dashboard.
- Select “Leads” or “Sales” as your campaign goal.
- Choose “Search” as the campaign type.
- Under “Select the ways you’d like to reach your goal,” untick “Display Network.” Leave Search Network ticked only.
Excluding Display Network at this stage keeps your budget focused on high-intent search traffic. Display can be added later once you have baseline data.
Step 2: Set location and language targeting
Precise location targeting is one of the highest-impact settings in any campaign. Targeting “People in or regularly in your targeted locations” prevents your ads from showing to users who are merely searching about your area from elsewhere. That single setting reduces wasted spend without touching your bids.
Set your locations to the specific UK cities, counties, or postcodes your business serves. Avoid “United Kingdom” as a blanket target unless you genuinely serve the entire country. Set language to English.
Step 3: Set your budget and bidding strategy
Starting daily budgets of £10–£50 give new campaigns enough data to learn without burning through budget before you have results to analyse. A £20 daily budget is a practical starting point for most UK SMEs.
For bidding, select “Maximise Clicks” and set a maximum CPC cap. This gives you control over cost per click while Google finds traffic. Do not use Target CPA or Maximise Conversions at launch. Switch to automated bidding only after 50+ conversions have been recorded. Before that threshold, automated strategies lack the data to perform reliably.
Step 4: Build your ad groups and keywords
Group your keywords by theme, with one ad group per service or product category. Use phrase match as your default match type at launch. Broad match generates too much irrelevant traffic early on, and exact match alone limits reach too severely.
Add negative keywords immediately. Terms like “free,” “jobs,” “DIY,” and “salary” attract clicks from people who will never buy from you. Adding them from day one protects your budget before a single pound is spent.
Pro Tip: Build a negative keyword list in a spreadsheet before you open the campaign builder. Paste it in during setup rather than adding terms reactively after wasted spend has already occurred.
Step 5: Write your Responsive Search Ads
Responsive Search Ads accept up to 15 headlines and 4 descriptions, and Google tests combinations to find what performs best. That flexibility increases click-through rates compared to static ads with fixed text. Use all available headline slots and write each one as a standalone phrase that makes sense in any combination.
- Include your primary keyword in at least 2 headlines
- State a clear benefit or differentiator (e.g., “Free quotes,” “Same-day service,” “Rated 5 stars”)
- Add a call to action in at least one headline (“Call today,” “Get a quote”)
- Use descriptions to expand on benefits and address objections
- Pin your most critical headline to position 1 if brand consistency requires it
Add ad assets (formerly called extensions): sitelinks, callouts, structured snippets, and a call asset if you take phone enquiries. These expand your ad’s footprint on the search results page at no extra cost per click.
How to set up conversion tracking and UTM parameters
Conversion tracking is the foundation of every optimisation decision you will ever make. Without it, you are managing a campaign blind.
Install the Google Tag on your website via Google Tag Manager. Then, inside your Google Ads account, go to Goals and create a conversion action for “Form submission.” Set the conversion window to 30 days and the value to whatever a lead is worth to your business.
A dedicated thank-you page URL fires conversion tags reliably and gives you a clean, verifiable signal every time a form is completed. Without it, your conversion data will be incomplete or entirely absent.
Without UTM tracking templates, paid ad traffic merges with organic search traffic in Google Analytics 4, making it impossible to attribute leads to specific campaigns or keywords. Add a UTM template at the account level in Google Ads settings so every click is tagged automatically.
Common conversion tracking mistakes to avoid:
- Using a pop-up “thank you” message instead of a separate page
- Firing conversion tags on the form page itself rather than the confirmation page
- Forgetting to link Google Analytics 4 to your Google Ads account
- Not verifying that tags are firing using Google Tag Manager’s preview mode
UTM parameters distinguish paid traffic from all other sources in your analytics reports. Set the template at account level so it applies to every campaign automatically, rather than adding it manually to each ad.
How to review, launch, and optimise your campaign
Before you publish, run through this checklist:
- Campaign goal set to Leads or Sales
- Display Network excluded
- Location targeting set to “People in or regularly in your targeted locations”
- Daily budget confirmed
- Bidding set to Maximise Clicks with a CPC cap
- At least one Responsive Search Ad per ad group with all headline slots filled
- Negative keyword list added
- Conversion tracking verified in Tag Manager preview mode
- Google Analytics 4 linked to the Google Ads account
Once published, Google reviews new ads within a few hours to one business day before they go live. Plan your launch for a Tuesday or Wednesday morning so you have a full working week to monitor early performance.
Pro Tip: Check your Search Terms report every two to three days in the first fortnight. Every irrelevant term you find becomes a new negative keyword. This is the single fastest way to improve campaign efficiency in the early weeks.
Early optimisation priorities
| Priority | Action | Timing |
|---|---|---|
| Negative keywords | Review search terms and exclude irrelevant queries | Every 2–3 days, first month |
| Ad performance | Pause headlines with low click-through rates | After 500+ impressions |
| Bidding strategy | Switch from Maximise Clicks to Target CPA | After 50+ conversions |
| Budget scaling | Increase daily budget by 20% increments | When cost per lead is profitable |
Negative keyword maintenance is the most neglected task in Google Ads management and one of the most effective ways to reduce wasted spend. Treat it as a weekly routine, not a one-off task. For a broader view of what a well-run PPC campaign requires, the PPC campaign checklist for UK SMEs covers the full lifecycle from launch to ongoing management.
Key takeaways
A successful Google Ads campaign requires Expert Mode, a dedicated thank-you page, UTM tracking, precise location targeting, and a disciplined negative keyword routine from day one.
| Point | Details |
|---|---|
| Use Expert Mode only | Smart Mode removes bidding, targeting, and negative keyword controls you need. |
| Start with a modest budget | £10–£50 per day gives new campaigns enough data without excessive risk. |
| Track conversions from day one | A dedicated thank-you page fires conversion tags reliably and accurately. |
| Add negative keywords immediately | Terms like “free” and “jobs” waste budget before your first lead arrives. |
| Switch bidding strategies carefully | Move to automated bidding only after recording 50 or more conversions. |
What I have learned from launching Google Ads for UK SMEs
The single biggest mistake I see from business owners setting up their first campaign is treating Google Ads as a set-and-forget channel. They spend an afternoon on the setup, publish the campaign, and check back two weeks later wondering why the results are poor. By that point, budget has been wasted on irrelevant search terms that a quick review would have caught on day two.
Expert Mode intimidates people at first. The interface is dense and the options are many. But every control it offers exists for a good reason, and using it correctly is what separates campaigns that generate profitable leads from ones that drain budget with nothing to show. I have never seen a Smart Mode campaign outperform a well-configured Expert Mode campaign over any meaningful time period.
Conversion tracking is not optional. I know that sounds obvious, but I regularly audit accounts where it has been set up incorrectly, or not at all. When tracking is broken, every optimisation decision is based on guesswork. Fix tracking first, before you spend a single pound on clicks.
Start with a budget you are comfortable losing while you learn. Scale only when your cost per lead is profitable and your conversion tracking confirms it. The Google Ads tips for UK businesses guide covers bidding strategy progression in more detail if you want to go deeper on that topic.
The businesses I see succeed with Google Ads are not the ones with the biggest budgets. They are the ones who check their search terms reports regularly, add negative keywords without hesitation, and adjust bids based on actual data rather than instinct.
— Martin
How Citricmedia supports UK businesses with Google Ads
Running a Google Ads campaign correctly from the start takes time, technical knowledge, and consistent attention. Many UK business owners set up their first campaign with good intentions and find that the ongoing management pulls them away from running their business.
Citricmedia has over 27 years of experience managing performance-driven Google Ads campaigns for UK SMEs across a wide range of sectors. The team handles everything from account configuration and conversion tracking to ongoing bid management and reporting, so you can focus on the leads coming in rather than the platform generating them. If you want expert support getting your campaign set up and profitable, get in touch with Citricmedia today.
FAQ
What is Expert Mode in Google Ads?
Expert Mode is the full-control interface in Google Ads that gives you access to manual bidding, negative keywords, precise location targeting, and all campaign settings. Smart Mode hides most of these controls and is not recommended for serious campaigns.
How much should I spend on Google Ads as a UK small business?
A daily budget of £10–£50 is the recommended starting range for new campaigns. This gives you enough data to make informed decisions without committing large sums before you know what works.
Why do I need a thank-you page for conversion tracking?
A dedicated thank-you page with a unique URL allows your Google Ads conversion tag to fire reliably every time a form is submitted. Pop-up confirmations do not provide a trackable URL and cause conversion data to be missed or inaccurate.
When should I switch from Maximise Clicks to Target CPA bidding?
Switch to Target CPA or Maximise Conversions only after your campaign has recorded 50 or more conversions. Before that threshold, automated bidding strategies lack sufficient data to perform reliably.
What are negative keywords and why do they matter?
Negative keywords are terms you exclude from your campaign so your ads do not show for irrelevant searches. Adding terms like “free,” “jobs,” and “DIY” from day one prevents wasted spend on clicks that will never convert.